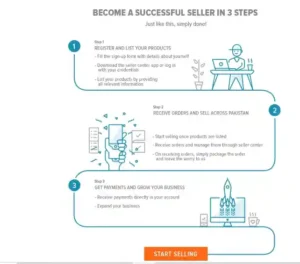
Learn to make a Daraz seller account and start selling online. We will be helping you in setting up an account, listing products, and growing your business with step-by-step guidelines from the largest e-commerce platforms. Let’s get started and grow on the road to success. Daraz is one of the greatest online markets in South Asia, and doing business through getting the seller account on that particular site can do amazing miracles with your business, fetching thousands of potential buyers towards your doorsteps. So, here is a step-by step guide on how to start creating a seller account at Daraz.
Step by Step: Create a Daraz Seller Account
1. Visit the Daraz Seller Center website
For starters, you may visit the Daraz Seller Center website for your country. You will find links for specific regions: Pakistan, Bangladesh, and Nepal, so choose the one you will sell your products from.
2. Register as a New Seller
Once you are on the Daraz Seller Center page, click “Register” and fill out the easy account creation form.

3. Choose Your Account Type
Daraz has two kinds of seller accounts:
Individual Seller: This is if you are a small business or an individual seller without a registered company.
Business Seller: This is ideal for big businesses or registered companies with a lot of stock.
Select the one that suits your needs.
4. Enter Your Personal and Business Information
Fill in the details below in the registration form accurately:
Full Name: It is your legal name on your identification documents.
Phone Number and Email: It will be used for verification. Make sure that your phone number and email are active.
Business Name (for Business Accounts): It will appear on Daraz to be seen by customers. Choose a business name that is apt for your brand.
Once you fill out the above information, click Next.
5. Verify Your Phone Number and Email
Daraz will send a verification code to your telephone number and email address. You need to enter the codes to confirm the account. This is considered an important step for securing your account and future communications.
6. Fill in Business Information and Bank Account
To get your earnings from Daraz, fill in the correct details in your bank account as valid information:
Bank Account Name: This should correspond with your business name (business accounts) or full names.
Bank Account Number: Be sure to ensure the same for no delay in remittance.
Bank Name and Branch: If you would like to add your branch name or code.
Fill in other business details like your business registration number (if applicable) and tax information.
7. Upload Required Documents
Depending on your country, you may need to upload specific documents for verification. Here are common requirements:
- National ID or Passport: For identity verification.
- Business Registration Certificate (for Business Accounts): Required if you’re registering as a company.
- Bank Statement or Utility Bill: To verify your address and bank details.
Ensure your documents are clear and meet the size requirements before uploading.
8. Agree to Terms and Conditions
Read up carefully on the seller terms and conditions that Daraz has. Here are the stated policies, guidelines, and rules of the platform. Sellers have to adhere to them. A checkbox is presented with a check in it, which you just have to tick; then, you click on Submit for the successful confirmation of your registration.
9. Complete Seller Training (If Required)
Daraz can ask the new sellers to register for an online training course. This will make the seller learn how to list products, manage orders, respond to customer inquiries, and optimize your listings for better sales. Hence, this training will give you the knowledge needed to be a successful seller.
10. Start Listing Your Products
After your seller account has been approved by Daraz, you can add your products to the platform. Here is how:
- Go to the Seller Center Dashboard: Use your login credentials to access your account.
- Click on “Add Product”: Follow the instructions to fill in product details such as title, description, images, price, and stock quantity.
- Optimize Listings: Use relevant keywords in titles and descriptions to help customers find your products more easily.
11. Manage Orders and Customer Inquiries
When customers start ordering your products, you’ll need to manage orders efficiently. Daraz’s Seller Center provides tools to:
- Process Orders: Accept, pack, and ship orders in a timely manner.
- Track Deliveries: Use Daraz’s tracking features to monitor delivery status.
- Respond to Customer Inquiries: Engage with customers to build trust and encourage repeat purchases.
12. Receive Payments
Daraz processes payments periodically based on your completed sales. Ensure you are connected to the right account so there is no delay in receiving those payments. Payments are processed either biweekly or monthly, depending on a certain policy of the service.
Tips for Success on Daraz
- Optimize Product Listings: Use high-quality images and detailed descriptions to attract customers.
- Run Promotions and Discounts: Daraz frequently hosts campaigns; participating in these can boost your visibility.
- Maintain Good Ratings: Provide excellent customer service, ship products on time, and avoid cancellations.
- Monitor Performance Metrics: Regularly check your account analytics to improve your sales strategy.
Conclusion
Therefore, you will be able to cover a large market by developing your business through this online platform by creating your seller account on Daraz. Following this guide, surely, you will become one of the most promising Daraz sellers in the future. Just continue updating your listings, keep on delivering good service, and make yourself approachable for the customers to make proper utilization of your Daraz presence.

